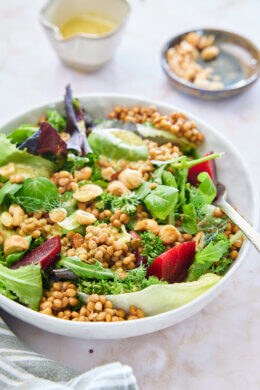
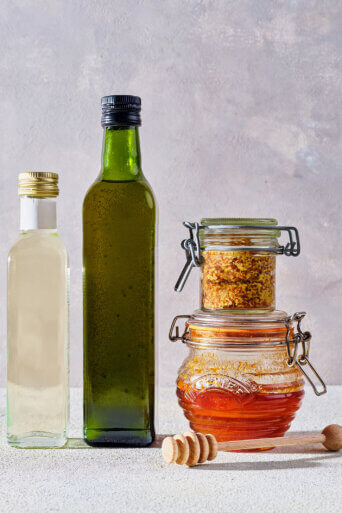
When you talk about food photography the shutterspeed is not really relevant most of the time, at least not when you’re working with a tripod (and I tend to do that) and have a release cable with you. It becomes a whole different ballgame when you’re shooting wildlife or people that are moving. I’m gonna focus on wildlife for this post as I have a couple of good examples to illustrate what I mean.
If you look at your camera and at the three components that make up the lighting settings, then we have aperture, shutterspeed and iso settings. While aperture controls the amount of light hitting your sensor, the shutterspeed controls how long that light will hit the sensor. The two elements are always linked. Change one and you would need to change the other two to keep the same lighting settings.
Now when you talk about shutterspeed one of the most critical things is to understand how long you can take a crisp and sharp photo using a handheld camera. There are many variables that come into play here and most importantly I would say is to get to know your own camera and your own limitations. Not everyone can shoot at the same shutterspeeds.

Even fairly slow moving animals might make sudden movements so try and be safe when picking a shutterspeed
If you think about it, it makes sense that the heavier your camera and your lens combination is, the faster your shutterspeed should be. But to give a rule of thumb here; if you’re unsure try and have a shutterspeed that is equal or faster then the focal length of your lens. What does that mean? Say you have a telelens with a focal length of 200mm. In that case – using an SLR – you would have to have a shutterspeed that is at least 1/200s or faster. And faster means 1/250, 1/500s, 1/1000 and up. Slower is in the range of 1/125, 1/60 and so on. If you have a steady hand you can try and go lower, but if you’re a bit of shaky person don’t even attempt to do that.
Make it a habit to check your shutterspeed. You can easily do that while you peer through the lens. See those little digits at the bottom of your viewfinder? Those are referring to your shutterspeed, aperture and iso. In which order they are is kind of dependant of your camera but in general it would be first shutterspeed, then aperture and then iso. Usually there is the exposure compensation grid showing up too in between your aperture and the iso.
In the viewfinder a shutterspeed of 1/200s might read as 200. So that could be a bit confusing in the beginning but you’ll get used to it quite quickly.
So that is the shutterspeed in relation to you and your stability. But what happens when you put a moving object or person into the equation? Then there is another element you will need to control. And that is the speed of which your subject is moving. To give a good example I have these photos of a hummingbird. Notoriously difficult to photography, so trust me when I say I shot literally hundreds of photos to get maybe 2-3 good ones.
The first one above is shot at a shutterspeed of 1/800 s. That is a relatively fast shutterspeed but you can still see that the wings are pretty blurred. In order to get your shutterspeed so high you will need to increase your iso settings in order to get there. In this case I had increased the iso to 1250 and it was a fairly bright day!
While the settings of the next photo are exactly the same, you can actually now make out the wings a little bit better but still being blurred. In this case it has to do in which motion the hummingbird is. Are the wings going upwards or downwards. Ofcourse there is no way on earth you’ll be able to see that with the naked eye though!
Now here we’re getting somewhere although probably still not sharp enough if you look at it closely but I thought it was good enough! The shutterspeed used here is 1/2000s at f5.6. Because it was taken early in the morning we had a bit more light then the day before so I could increase my shutterspeed while still maintaining the same iso of 1250. I was pretty pleased overall with those images! The thing to do also with creatures moving this fast, is not to try and follow them… It will make you dizzy! Instead focus on an area where you know they will appear next and just keep looking at that point until you see them popping up in the frame. Because my autofocus would be all over the please, as well as my lighting settings I was on full manual mode; for both the focus as well as everything else. And patience is the main component here! I cannot imagine people like Frans Lanting sitting in a creepy crawly jungle for days or weeks waiting for that perfect shot! I got tired of it after a few hours already!
Good thing I am not a nature photographer!
Now when it comes to – for instance – birds or other animals that are moving in a sidewards motion to you, what you can also do is move your camera long with them while you press the shutter. That will allow for some leeway if they go too fast and if successful (and it can be a bit of a hit and miss thing) you will have a pretty cool picture too!
I will probably be spending a few more posts on the subject of shutterspeed with varying subjects but to not make it a 1000 word post (oops, a little over!) this is it for now!


Ah thank you for this post!
Lately I have been shooting dogs in motion but I didn’t get very good shots… I’m going to try to play with the shutterspeed then.
Ah yes, animals are really difficult especially since you never know in which direction they will be moving! Can’t wait to see the results Sandrine!
I love your pictures! Your such a talented photographer and it seems like your doing really good with different settings and actions to capture the magic
Actually I’m still in love with the photo of the little Fiat from your trip to Rome. Have a great weekend.
Thanks so much Jasmin! Glad you like them (and the little fiat..
)
Beautiful photos. It’s so true that you take a ton of photos and only get 2 or 3 when trying to get photos of moving object. I often end up with blurry ones… The shot of a lizard is pretty impressive!
Prachtige foto’s. Ik overweeg toch om een spiegelreflex te kopen. Een instapmodel, bijvoorbeeld de Nikon D3100 of een soortgelijk model van Canon. Een Canon 5D mark III zit er helaas niet in
Heb jij wellicht een tip voor een goed instapmodel?
groetjes,
Marianne.
These pictures are stunning Simone!!
)
You are slowly convincing me that I do need to learn to shoot manual pictures
My favorite is the top bird – the iguana is impressive too!
xox Karin
Thanks Karin! Manual can just be sort of easier to work with strangely enough…
Your photos are insane! I want that first little birdie on my wall!!!!
Thanks so much Christina…!